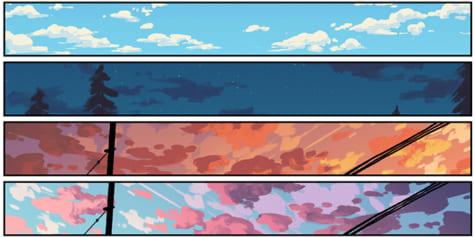
5 Simple Techniques to Draw a Stunning Sky: A Step-by-Step Guide for Beginners Written by Daisie Team Published on 21 June 2023 7 min read ContentsTechnique 1: Using ColorsChoosing the Right Color PaletteColor Blending TechniquesTechnique 2: Cloud FormationCreating Various Cloud ShapesAdding Texture to CloudsTechnique 3: Light and ShadowsDetermining the Light SourceCreating Shadows on CloudsTechnique 4: Sunsets and SunrisesCreating a Color GradientIncorporating SilhouettesTechnique 5: Night SkiesDrawing Stars and ConstellationsAdding the Moon to Your SkyHave you ever wanted to draw the sky but didn’t know where to start? Drawing a stunning sky can seem intimidating, especially if you’re a beginner. But fear not, because we’ve got you covered with five simple techniques that will help you create beautiful skies in no time. Let’s dive in!Technique 1: Using ColorsColors play a vital role in capturing the essence of the sky and setting the mood of your artwork. In this section, we’ll explore how to choose the right color palette and blend colors effectively to create a stunning sky.Choosing the Right Color PaletteWhen selecting colors to draw the sky, consider the following tips:Time of day: The colors in the sky change depending on the time of day. For instance, you’ll see vibrant oranges and reds during sunsets, while daytime skies are often blue with white clouds.Mood: The colors you choose can set the mood for your artwork. Soft pastel colors can create a calm, serene atmosphere, while bold, contrasting colors can evoke a sense of drama or energy.Harmony: To make your sky feel cohesive, choose colors that work well together. You can use a color wheel to help identify complementary and analogous color schemes.Color Blending TechniquesBlending colors is essential to creating a realistic sky — after all, the sky isn’t just one flat color. Here are some techniques to help you blend colors effectively:Layering: Apply multiple layers of color, starting with lighter shades and gradually building darker tones on top. This technique works well with colored pencils, pastels, and paint.Gradient: Create a smooth transition between colors by applying them side by side and gently blending where they meet. This technique can be done with paint, markers, or digital tools.Scumbling: Use a dry brush or pencil to lightly “scribble” one color over another, allowing the colors to mix and create a textured effect. This technique works well for creating a hazy, atmospheric sky.Now that we’ve covered the basics of using colors to draw the sky, let’s explore how to create realistic cloud formations.Technique 2: Cloud FormationClouds are a crucial element when it comes to drawing the sky. They can add depth, atmosphere, and interest to your artwork. In this section, we’ll discuss creating various cloud shapes and adding texture to them.Creating Various Cloud ShapesNot all clouds look the same, and incorporating different cloud shapes can make your sky more visually engaging. Here are some common cloud types and how to draw them:Cumulus clouds: These are fluffy, cotton-like clouds often seen on sunny days. To draw cumulus clouds, start with a curved line for the base and then add rounded, irregular shapes on top. Vary the size and shape of the “puffs” to make the cloud appear more natural.Stratus clouds: These are flat, horizontal clouds that often appear on overcast days. To draw stratus clouds, create a series of horizontal lines with slight curves and varying thicknesses to give the appearance of layered clouds.Cirrus clouds: These are thin, wispy clouds found at high altitudes. To draw cirrus clouds, use light, feathery strokes that taper at the ends to create a delicate, airy appearance.Adding Texture to CloudsAdding texture to your clouds can make them look more realistic and visually interesting. Here are some techniques you can use:Hatching and cross-hatching: Use short, parallel lines to create shading and texture. For cross-hatching, add another layer of lines going in the opposite direction.Stippling: Create texture using small dots or specks. Vary the density of the dots to create areas of light and shadow within the cloud.Sponging: If you’re working with paint or pastels, try using a sponge or a piece of crumpled paper to dab color onto your clouds. This can create an interesting, irregular texture.With clouds in place, it’s time to add depth and dimension by incorporating light and shadows.Technique 3: Light and ShadowsMastering the play of light and shadows can make a huge difference in your ability to draw the sky. This technique adds depth and brings your clouds to life. Let’s explore how to determine the light source and create shadows on clouds.Determining the Light SourceBefore you start adding shadows, it’s essential to determine the light source in your drawing. The position of the light source will dictate where the shadows fall on the clouds. Consider these common light sources and their effects:Sunlight: If the sun is your light source, the shadows will generally be on the side of the clouds opposite the sun. The position of the sun in the sky (morning, noon, or evening) will also affect the angle of the shadows.Moonlight: Moonlight creates softer, more diffused shadows. The position of the moon will also influence the direction of the shadows.Artificial light: If your scene includes artificial light, such as streetlights or city lights, consider how the light will interact with the clouds and cast shadows accordingly.Creating Shadows on CloudsOnce you’ve determined your light source, follow these steps to create realistic shadows on your clouds:Identify the areas of the clouds that would be blocked from the light source. These areas will be in shadow.Use a darker shade of your cloud color to fill in the shadowed areas. Be sure to blend the edges where light and shadow meet to create a smooth transition.Add highlights to the areas of the clouds directly facing the light source. Use a lighter shade of your cloud color to emphasize the lit areas and create contrast.By mastering light and shadows, your sky will look more dynamic and lifelike. Now, let’s explore how to draw stunning sunsets and sunrises.Technique 4: Sunsets and SunrisesSunsets and sunrises are some of the most breathtaking sky scenes to draw. They involve a beautiful interplay of colors and silhouettes, creating a dramatic effect. Let’s learn how to create a color gradient and incorporate silhouettes to draw the sky during these magical hours.Creating a Color GradientTo capture the essence of sunsets and sunrises, you’ll need to create a smooth color gradient. Here’s how to achieve that perfect blend of colors:Choose your colors: Sunsets and sunrises often feature a mix of warm colors like red, orange, yellow, and soft pinks or purples. Pick a few colors that work well together to form your gradient.Start with the lightest color: Apply the lightest color near the horizon, where the sun is closest. This could be a soft yellow or pale pink, depending on your chosen color scheme.Blend in the next color: As you move away from the horizon, blend in your next color. For instance, you could transition from yellow to orange. Use smooth, circular motions to create a seamless blend between the two colors.Continue the gradient: Keep blending colors as you move up the sky, transitioning to darker shades as you go. The sky will usually be the darkest at the top, with colors like deep reds or purples.Now that your color gradient is in place, let’s add some silhouettes to complete the scene.Incorporating SilhouettesSilhouettes of trees, buildings, or other landscape elements can add depth and interest to your sunset or sunrise sky. Here’s how to create silhouettes:Choose your subjects: Decide what elements you want to include in your scene. You could have trees, mountains, buildings, or even people. The choice is yours!Position the subjects: Place your chosen subjects along the horizon line, where they will interact with the lightest part of your color gradient. This will create a strong contrast between the silhouettes and the sky.Fill in the silhouettes: Use a dark color, like black or dark brown, to fill in your subjects. Keep the edges crisp and clean to maintain the silhouette effect.With your silhouettes in place, your sunset or sunrise sky will be both dramatic and beautiful. Next, let’s explore how to draw the sky during nighttime, complete with stars and the moon.Technique 5: Night SkiesNight skies offer a completely different experience compared to daytime scenes. Learning how to draw the sky at night will allow you to capture the beauty and serenity of the stars and the moon. Let’s dive into how to draw stars, constellations, and the moon for a stunning night sky scene.Drawing Stars and ConstellationsStars are the most iconic part of a night sky, and drawing them is easier than you might think. Here’s how to create realistic stars and constellations:Start with tiny dots: Use a white or light yellow color to create small dots scattered across the sky. Vary the size and density of the dots to mimic the appearance of stars in the sky.Add some twinkles: For a few of the larger dots, create a tiny cross or an “X” shape to give the impression of a twinkling star. Don’t overdo it—just a few twinkles here and there will do the trick.Create constellations: If you want to include specific constellations in your sky, look up their shapes and use your dots to recreate them. Connect the dots with thin lines to make the constellations stand out.With your stars in place, it’s time to add the final touch to your night sky: the moon.Adding the Moon to Your SkyThe moon is a beautiful element that can make your night sky even more captivating. Here’s how to draw a realistic moon:Choose the moon phase: The moon’s appearance changes throughout the month, so decide which phase you want to draw. You can choose from full, crescent, gibbous, or any other phase that you find appealing.Draw the shape: Start by sketching the shape of the moon according to the chosen phase. For a full moon, draw a circle; for a crescent moon, draw a thin, curved shape.Add texture: To make your moon look more realistic, add texture using shades of gray. Focus on the moon’s craters and shadows to give it depth and dimension.Position the moon: Place the moon in your sky, making sure it’s proportionate to the rest of your scene. Keep in mind that the moon should be the brightest part of your night sky.With your moon in place, your night sky scene is complete! Now you have all the techniques you need to draw the sky in various settings and conditions. Practice these techniques, and soon you’ll be able to create stunning sky scenes with ease.If you’re eager to improve your character design skills and bring your unique ideas to life, don’t miss the workshop ‘How to Draw Beautiful Character Designs from Scratch’ by Trey Zimmerman. This workshop will guide you through the process of creating captivating character designs, ensuring your creations stand out and leave a lasting impression. Related Articles Artistic Journey of Yasumasa Morimura: Analysis 8 min read 8 Nov 2023 Kinetic Art of Yuko Mohri: Insights & Inspiration 6 min read 8 Nov 2023 Art & Life of Mariko Mori: Insights & Inspiration 7 min read 8 Nov 2023 Yoko Ono: Art, Activism & Impact of a Cultural Icon 7 min read 8 Nov 2023 Javier Calleja: Journey of a Contemporary Art Master 10 min read 8 Nov 2023
5 Simple Techniques to Draw a Stunning Sky: A Step-by-Step Guide for Beginners
by admin |Lượt xem: 118
Rate this post
Bài viết liên Quan
https://gemma.edu.vn là blog chia sẻ kiến thức về việc cải thiện sức khỏe, chế độ dinh dưỡng phù hợp để cơ thể phát triển một cách tốt nhất. Vui lòng ghi rõ nguồn nếu phát hành nội dung từ đây.


