In this post, I’m sharing how to install drawer boxes into your projects using side mount drawer slides!
If you have seen many of my projects, you may have guessed that I love building and installing drawers. The large number of dresser plans may have given that away ha!
I love drawers so much that I decided to put together a whole series of videos and posts on measuring, building and installing them into your projects!
If you haven’t already, be sure to check out part 1 on how to measure for drawer fronts and drawer boxes. Then, head to part 2 on how to build a drawer box.
In this post, we are diving into part 3 of the series–how to install the drawer box and the drawer slides.
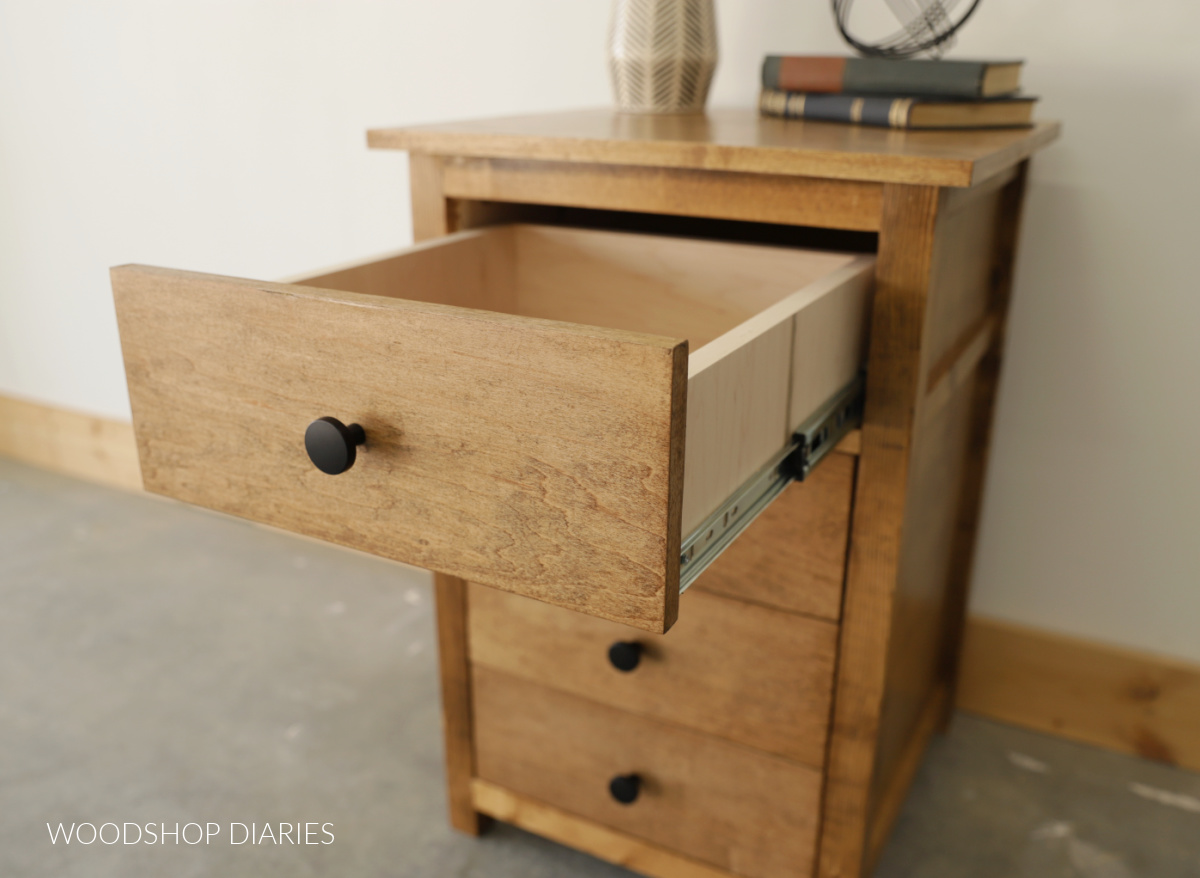
I’ve been using side mount drawer slides in my DIY projects for this for years (and highly recommend them!) so that’s what I’ll be installing in this tutorial.
*This post contains affiliate links. See website policies.
Why Use Side Mount Drawer Slides?
There are many types of drawer slides out there–undermount, side mount, the small white ones that mount to the corners, even wooden options.
However, after trying my hand at all of the above, I’ve settled on my own personal favorite style–the side mount.
Side mount drawer slides install directly to the side of the cabinet (or piece of furniture) so they don’t usually require any additional bracing like undermount or wooden slides do.
They come in common sizes from 10″ to 24″ long (in 2″ increments) so it’s easy to find the size you need for your project.
Benefits of side mount drawer slides:
- Lots of size options
- Can get with or without soft close
- Inexpensive
- Long Lasting
- Heavy Duty
- Easy to Install and Adjust
These slides have two sections that separate using tabs on the sides so you can easily remove a drawer from a cabinet if needed.
To separate the sections, fully extend the slide and you’ll see a tab (it’s usually plastic). Push the tab up or down (the slide on one side of the drawer will go up and the other side will go down) and pull forward at the same time.
The slide will separate into two sections–one section mounts to the cabinet and the other section mounts to the drawer.
MOST side mount drawer slides can hold up to 100 lbs per pair (check your specific slides for specifications), so they’re great for both basic furniture and heavy duty workshop applications.
For the best price, I buy my side mount slides in bulk on Amazon since I use them in projects quite often.
What Tools Do You Need to Install A Drawer?
Installing a drawer box doesn’t require any fancy or specialty tools. Essentially, you’re just driving a few screws.
All you really need is a drill and/or driver (something to drive screws) and some basic measuring tools.
Tools & Materials:
- Drill/Driver
- Measuring Tape
- Square
- Scrap wood blocks (various sizes)
I use scrap wood blocks to help me space out my drawer boxes when I’m installing them onto the slides. No specific size wood blocks are required, I usually just mix and match whatever scraps I can find around the shop.
Jump to:
How to Install Drawer Slides
If you prefer to watch, check out this video that details the installation process over on my YouTube channel:
If at all possible, I recommend laying your cabinet or furniture piece on its side to install the slides. You’ll notice most of my photos below are shown this way.
This makes measuring, marking, and placing the slides MUCH easier. In most cases with stand alone furniture and cabinet projects, this is possible.
However, if it’s not possible to lay the project over, you can use clamps, scrap blocks, or a Kreg Drawer Slide Jig to help hold your slides in place while you screw them in.
Inset vs Overlay Drawer Slide Installation
Before installing drawer slides, you need to consider whether the drawer fronts of the project will be inset or overlay.
Check out this post to learn more about inset vs overlay drawer fronts.
Inset drawer fronts set INSIDE the frame while overlay drawer fronts LAY OVER the front of the frame.
If your drawer fronts are overlay, you can install the drawer slides so that the front edge of the slide is flush to the front edge of the cabinet or furniture frame.
However, if your drawer fronts are inset, you need to push the slides back from the front edge the thickness of your drawer front.
For example, if you’re drawer fronts will be ¾″ thick, install the slides ¾″ inset from the front edge of the cabinet.
Drawer Slide Spacing Tips
If there is any kind of framing underneath a drawer–like a bottom panel or dividers between drawers–I always mount my slides directly above these.
Those situations are the easiest. You simply place the bottom edge of the slide up against the frame or panel below it and use a speed square to ensure it’s square front to back as you screw it in. No need to measure or mark anything.
However, if there aren’t dividers or framing between all drawers, you’ll have to measure where to space out your slides.
There are several ways to do this, but I’ll share two of my favorite ways to figure out my drawer slide spacing below.
Before you dive into spacing, you’ll need to know your drawer front heights and gap rules. Check out this post on measuring for drawer sizing for details.
Drawer Slide Spacing Method #1: Drawer Front Heights + 1″
For this method, you simply take the heights of the drawer front(s) below the slide you’re installing and add 1″. This is where you line up the BOTTOM edge of your next drawer slide.
In the example below, the drawer fronts are all 5 ¾″ tall. The top and bottom slides mount flush to the bottom of the frame directly below them.
But for the middle two, the second from the bottom should be installed 5 ¾″ + 1″ up from the inside edge of the frame, and the next one should be 5 ¾″ + 5 ¾″ + 1″ up.
NOTE: If you’re installing inset drawer fronts, you measure this from the INSIDE of the frame. But, if you’re installing overlay drawer fronts, you would need to measure from the OVERLAY.
For example, if your drawer fronts will overlay your frame by 1″, then measure from 1″ outside the opening. See diagram below.
Drawer Slide Spacing Method #2: Align Bottom of Slide with Bottom of Drawer Fronts
For this method, you simply align the bottom edge of your drawer slides with the bottom edge of the drawer fronts.
In part 1 of this series–how to measure and size drawers–I showed you how to figure out your drawer front sizing/spacing.
You can reference that here to help you determine where the BOTTOM EDGE of each drawer front will be in the project. Then, line up the bottom edge of your slide at this location.
In the example below, with inset drawer fronts, measuring from the inside of the frame, I’d add ⅛″ for the gap at the bottom + 5 ¾″ for the drawer front + the ⅛″ gap between drawer fronts = 6″.
This is where the bottom edge of my next drawer front would be, so this is where I line up the bottom edge of my drawer slide.
Working my way up, for the next slide, I’d add the height of another drawer front + the ⅛″ gap (which is 11 ⅞″) and this is where the bottom edge of my next drawer front would be. So this is where I’d mount my next slide.
NOTE: If you’re installing inset drawer fronts, you measure this from the INSIDE of the frame. If you’re installing overlay drawer fronts, you would need to measure from the OVERLAY.
Install Drawer Slides
Once you figure out your spacing and slide locations, actually installing them is the easy part! All you need is a few screws.
Want to take this to the shop with you? Grab the printable drawer building guide here!
Normally, I’m installing slides into ¾″ (or thicker) material, so I’ll use some basic #6 x ⅝″ wood screws so they don’t go all the way through and poke out the other side.
Place the slide at the exact location you want it, hold it tight and extend it out. You’ll see several holes in the slide–some are small and round, some are large and round, and some are slotted.
I typically add a screw in a horizontal slotted hole around the middle and at the back. Then, I’ll add another screw in a round hole toward the front.
The exact holes you use isn’t critical–I just aim for one screw at the front, one in the middle, and one at the back. See video for more information.
The slotted holes allow for wood movement if your side panels are solid wood. But in the case where your sides are plywood, the wood movement is minimal, so you don’t really have to use them.
Face Frames and Spacer Blocks
If your side panel is flush across the inside like shown below, the slides simply install directly to the sides.
However, if you have a face frame or the inside panel isn’t flush to the opening, you will need to install “spacer blocks” to mount the slides onto.
Basically, these are just strips of wood that will mount to the side panels and come flush to the inside edge of the frame. See video for more information.
This desk is a great example of this. It was built with a face frame so the plywood side panels weren’t flush to the inside opening where the drawers will go.
So I had to cut and install spacer blocks to mount the drawer slides to. The drawer slides need to mount to something that is FLUSH TO THE INSIDE of the opening so they can slide open and closed.
You can see above that I glued and screwed some wood strips into the desk cabinet and you can see below that these are what I mounted the slides on.
I try to build my projects in such a way that mostly avoids the need for this. However, there are times when it’s necessary and simple spacer blocks work great.
How to Install Drawer Boxes
Once the slides are installed, you can add the drawer boxes into your project. There are several ways to do this.
I’ll share my two favorite methods below.
Installing Drawer Boxes Using Spacer Blocks
This is how I usually prefer to install my drawer boxes. First, place ¼″ plywood scrap strips across the bottom framing of the cabinet or furniture piece and extend the slides on both sides.
Just like when installing the slides to the cabinet, you’ll notice that there are round holes and slotted holes here, too.
Set the drawer on the plywood strips so that it’s sticking out the front of the cabinet about half way and move the slides so that they are flush to the front edge of the drawer box.
If your drawer boxes are made with ¾″ plywood sides, you can use the same #6 x ⅝″ screws to install the drawers as you did to install the slides. First, add one screw in a round hole at the front of each slide.
Then, fully extend the drawer box and add screws on each slide at the middle and at the back. See video for more information.
The slotted holes are great for making adjustments, but keep in mind that if you use the vertical slotted holes, the drawer can drop if weighed down.
Once the bottom drawer is in place, you can simply use some scrap blocks to space out the boxes above it and repeat this process to install them.
The number and size of scraps you’ll need will vary depending on how tall you made your drawer boxes, but you can mix and match scraps until you’re about to the bottom of the next drawer slide.
In this case, some ¼″ plywood and a 2×2 worked great.
Extend your slides, stack your next drawer on, and install exactly the same way with screws in the front, back and middle.
Work your way up, double checking that each drawer box is properly spaced so that it won’t interfere with the drawer front(s) above or below it.
Installing Drawer Boxes by Separating Slides
At the beginning of this post, I shared that side mount drawer slides have tabs that allow you to separate the section of the slides that mount to the cabinet from the section of the slide to mounts to the drawer.
Another way to install drawer boxes is by separating the slides this way and mounting them flush to the front and flush along the bottom edge of the drawer box.
After installing the slides on each side of the drawer, you can simply slide the box(es) back onto the slides in the cabinet.
And at this point, one way or the other, you should have your slides and your drawers installed into your project!
Ready to Wrap up Your Drawer Building Project?
Now, head to this post to learn how to install your drawer fronts to wrap up the entire drawer building process.
If you want to be the first to know when new posts and videos are out, be sure to subscribe to the newsletter below!
In the mean time, be sure to check out this complete drawer building guide and take a look at these projects to get some practice with drawers:
To save this guide for later, be sure to pin it or share it to your favorite social channel!
Until next time, friends, happy building!