How to Add a Tilt-Down Drawer Front
Learn how to replace your false drawer front with a tilt-down drawer front with storage!
Funny story…
(Ok, well actually, it’s not so much funny haha but more like funny I have to laugh so I don’t cry.)
Back in our last house, Corey and I had bought a few of these tilt-down drawer kits to help us convert the false drawer fronts in our bathroom. We figured it’d be the perfect place to store our toothbrushes and whatnot, and help keep the counter clear.
Well, we ran into some issues getting it installed and just…I don’t know…gave up.
We lived with no drawer fronts on the vanity for months (MONTHS!) while we swore we’d knock it out, and we legitimately ended up just moving without ever finishing it.
I was so bummed because I had been so excited to turn that silly, useless space into something functional. But alas, it wasn’t meant to be.
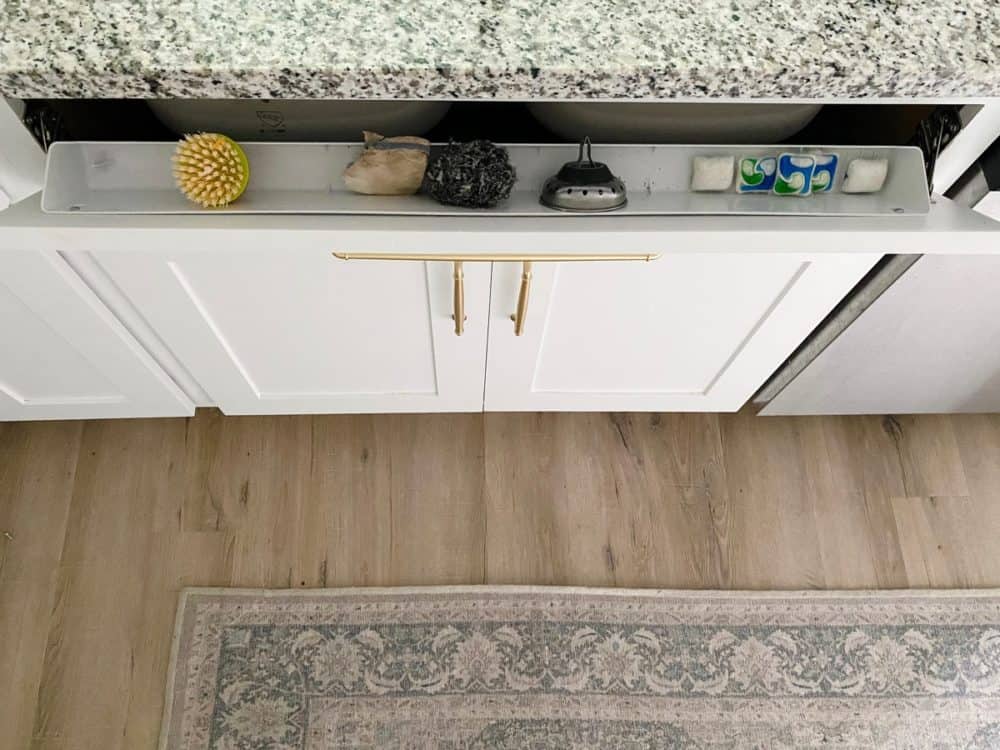
After a solid year or so, I’ve finally redeemed myself! This week, I converted the false drawer front in our kitchen to be a tilt-down so I can store some dishwasher pods, my scrub brush, and a few other little things and it’s life-changing already!
This was a really easy project that took me just a couple of hours to do, so I figured I’d share a little run down of the process and a few tricks I learned along the way.
How to install a tilt-down drawer front
We used this kit for our tilt-down drawer. It was simple to use and I definitely would buy it again (and probably will soon to do the same thing in my bathroom!).
Other than the kit, the only materials you’ll need are a screwdriver and a drill/driver with an 1/8″ bit. I also found this right angle attachment for my drill to be really helpful, but it’s not at all necessary.
Removing the drawer front
This part will vary wildly depending on your home, so it’s hard to say exactly what to do here.
For us, our false drawer fronts were just installed with these little clips – all I had to do to remove it was pull it off and then remove the clips and staples.
Our last house also had clips – but I heard from some of you on Instagram who had more complicated attachment methods…so, I’d recommend taking a peek to see how easy it is to pull them off first!
Installing the hinges
The directions included with the kit are pretty straightforward, so I won’t repeat it all here – but basically, you’ll mark and pre-drill for the hinges and then install them on either side of the cabinet box.
The kit recommends installing the hinges onto the cabinet frames and then attaching the drawer front while the hinges are in place. I found that to be just about impossible (the angles!), so I pulled them off the cabinet frame and installed them on the drawer front first. Then, I put them back on the cabinet frame second. It was much easier this way!
Once it’s all in place, you can put the tray in place! I went a little out of order from the directions and installed the tray before I attached the drawer front to the hinges – this seemed like a much easier method to me! Just don’t fully tighten the screws on the tray before you install it – get it installed, pull the tray back off (but leave the screws in place!) and then once the drawer front is in place you can slide the tray back onto the screws and tighten them down. No awkward angles involved!
I’m so glad I knocked this project out, and I’ve really been enjoying it already! It’s so nice to have my scrub brush off the counter (but still easy to access), and it’s been nice to have a few other regularly-used tools up there too so I’m not constantly bending down to grab them.
You may notice we also have a new faucet installed (and it’s sooooo pretty!).
There’s a funny (but not actually all that funny) story for that one too….
Waaaaaaaaay back in early March (or maybe even February!), I had a brand reach out that we’ve worked with in the past asking if we’d be interested in doing a collaboration on a new faucet. I was in the process of helping a friend redo her laundry room, so it was perfect timing to use it in there. I agreed, they sent me the faucet, and we went happily along on our way.
And then…before I could install the faucet…a global pandemic hit and I haven’t seen my friend in months. And, since we’re still taking social distancing really seriously, it doesn’t look like I’ll be able to anytime soon.
Insert sobbing emojis here.
We put it off for a long time, hoping that things would settle down enough to make it happen, but we’ve reached a point where it’s clear nothing is changing anytime soon, and we decided we might as well just use the faucet ourselves.
You know it was making me twitchy to have this beautiful faucet just sitting in my garage mocking me every time I went out there.
I tackled it by myself yesterday, and it was surprisingly much easier than I thought it’d be. I did it totally on my own and was so proud that I was able to do it!
It looks so much better, and I’m so glad to have a pull-down sprayer again – I much prefer this style of faucet to the ones where you have to pull the sprayer out from the side!
The faucet is the Antrom faucet from Pfister, and so far we’re really loving it!
A couple of questions from Instagram to address with swapping out the faucet:
- When you turn off the water to remove the old faucet, you just need to turn off the water directly to that faucet. There’s a shut-off valve for both hot and cold water under the sink, and you just twist to turn it off! I found this tutorial really helpful when removing the old faucet.
- I didn’t caulk around the base of the faucet at all. There wasn’t caulk on the old one, so I figured it didn’t need it. Most new, quality faucets come with a seal on the base that eliminates the need for caulk!
- The directions that came with our new faucet were extremely thorough and helpful. I knew nothing about installing a faucet before I got started, and it fully walked me through with no issues.
And with that, I knocked out not one but two totally new-to-me projects in one week and I’m feeling pretty good about things!